

 Important Important |
|---|
| The recommended method to implement this scenario requires an S2S VPN connection in order to ensure resilient connectivity. The following scenario was tested with both deployment methods (S2S, P2S) and P2S VPN connection wasn’t as stable as the S2S VPN connection. More details about setting up an S2S VPN can be found in this link. |
Introduction
In previous posts, we read what the MS Azure computing service has to offer for Domain Controller cases. In this post, we are going to talk about a specific scenario, how can we deploy more than one Domain Controllers in a nested virtualized environment hosted by only one Azure Virtual Machine. For this post purposes, we see how to accomplish that with one Domain Controller, but we follow the same steps for the others too. In this part (Part 1) we will read how to create the deployment main resources VM, VNet, Storage.
Architecture Diagram
This diagram describes the architecture of the scenario.
A Bare metal PC hosted a Hyper-V VM which was promoted to be a Primary Domain Controller.
An Azure VM hosted a Hyper-V VM with the ADDS role installed. The scenario was to replicate the domain to the nested Azure Domain Controller.
This scenario was implemented by using two P2S VPN connections to complete the replication. The PDC was connected to the Azure Hyper-V host, and the nested DC was connected to the Azure Hyper-V host too.

Prerequisites
To begin the deployment we make sure that we have all the following:
- Microsoft Account
- Active Azure Subscription
- A Virtual Machine with the Hyper-V feature enabled
- A Virtual Network
- An Azure Virtual Network Gateway, for the P2S VPN
 Note Note |
|---|
| In a production environment the VPN type MUST be Site-To-Site |
Prepare The Infrastructure in Azure
First, we have to deploy the Azure Virtual Machine. After Microsoft released Dv3 and Ev3 VM size, we are in position to deploy Virtual Machines on Azure to host Hyper-V virtual machines.
Create The Virtual Machine
From the left Main blade, click Create a resource and select Windows Server 2016 VM, as the image below shows.

The Basics Tab
In this tab, we are able to enter the data for the Instance details, Administrator account, and Inbound port rules, as image below shows.
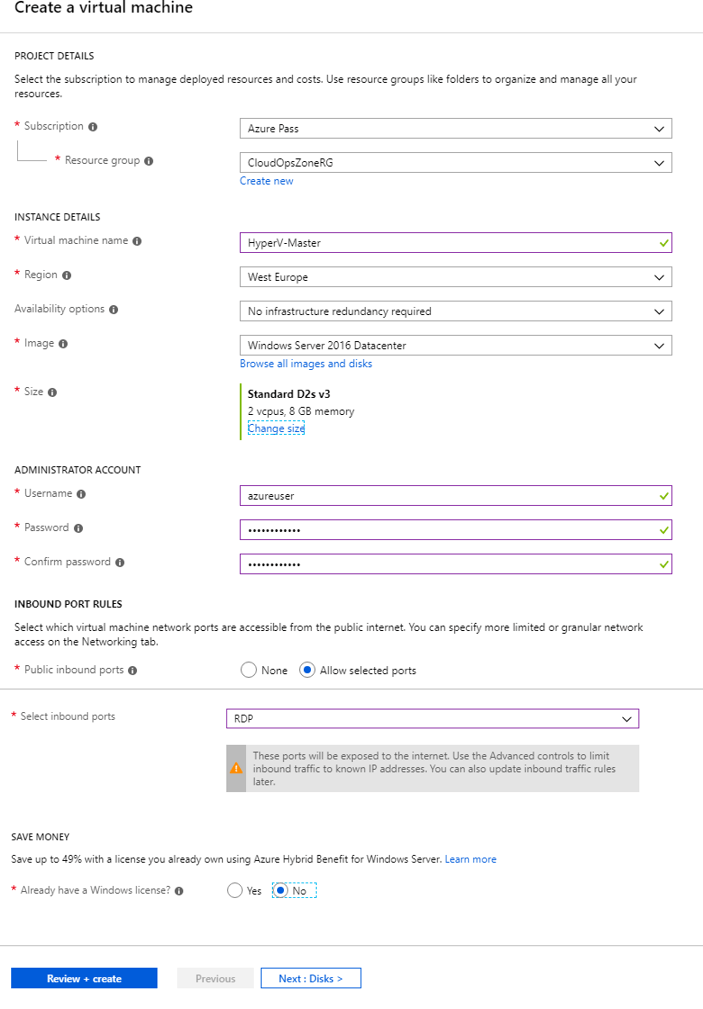
| Setting | Value |
| Subscription | Select an existing Subscription |
| Resource Group | Create a new or Select an existing Resources Group |
| Virtual Machine Name | Type the Virtual Machine Name |
| Region | Select the Region where the resources will deploy |
| Image | Select the Image, e.g Windows Server 2016 Datacenter |
| Size | Select the Virtual Machine size, e.g Standard D2s v3 |
| Username | Type the admin account Username |
| Password | Type the admin account Password |
| Confirm password | Re-type the admin account Password |
| Select inbound ports | Select the port(s), that the Virtual machine will be accessible from that. |
The Disks Tab
In the second tab we can configure the disk system in the Virtual Machine.
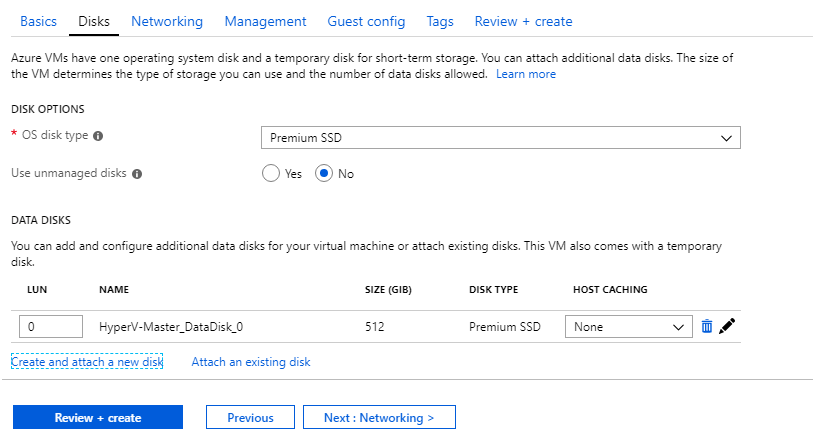
| Setting | Value |
| OS disk type | Select the disk type for the OS, e.g Premium SSD |
| Data Disks | In this section we able to attach extra Data disks to the Virtual Machine. |
The Networking tab
In this tab, we can configure a new or select an existing virtual network for the Virtual Machine.

The Review + Create tab
In this tab we just make a review of the deployment, check if these are the product details that we want, click the buttonCreate.

Create Point-To-Site VPN (P2S)
Create a Gateway Subnet
The Gateway Subnet encrypts the traffic between an Azure VNet and On-premises network.

Define the Address range e.g [10.0.1.16/28], and click OK

Search for the service “Virtual network gateway“, click the first result like the image below shows and at the next blade click Create.

At the {Create virtual network gateway} blade fill all the information and click Create to start the deployment.

| Setting | Value |
| Name | Type the Virtual Network Gateway Name |
| Gateway Type | Select VPN gateway type |
| VPN Type | Select Route-based VPN type |
| SKU | For the post needs, we select the Basic SKU |
| Virtual Network | Select the Vnet, which contains the Virtual Network Gateway Subnet |
| Public IP Address | Type a Name for the Virtual Network Gateway Public IP |
| Subscription | Select the Azure Subscription |

| Note |
|---|
| The Virtual Network Gateway deployment can take up to 50 minutes. |

The Hyper-V Feature
To enable the Hyper-V role/feature we have to follow the next steps.
Step 1 – Add Roles and Features
From the Server Manager, select Manage – Add Roles and Features

Step 2 – Before You Begin.
In the Add Roles Wizard, click Next >

Step 3 – Select installation type
Select the installation type, Role-based or feature-based installation (default), and click Next >

Step 4 – Server Selection.
In the server selection window, just click Next >

Step 5 – Select server roles
From this point, select the required features for the Hyper-V role.

Step 6. Select Features
In the previous step, we Added the Hyper-V role, in this we just click Next >

Step 7 – Create Virtual Switches
Select Ethernet card and click Next >

Step 8 – Default Stores
Use the default location for virtual disk and configuration files, or select a new and click Next > to continue.

Step 9 – Confirm installation selections
Confirm the configuration and click Install, to begin

Hyper-V Manager
In the following steps we proceed with the Hyper-V configuration.
Step 1 – Create a Nat Virtual Switch
Open the Hyper-V Manager. From the right side click Virtual Switch Manager… – Select Internal and click Create Virtual Switch.

Type a Name, e.g [Internal-Switch], and click OK.

Execute the Get-NetAdapter PowerShell command to view the virtual switch properties and keep note of the ifindex parameter.

We keep the ifindex parameter and we move on to the next step to create the IP address for the NAT Gateway.
To do that we execute the command New-NetIPAddress,
New-NetIPAddress - IPaddress 10.0.0.1 -PrefixLength 24 -InterfaceIndex 17

The next and final step in terms of NAT Gateway creation is the New-NetNat command
New-NetNat -Name "InternalNat" -InternalIPInterfaceAddressPrefix 10.0.0.0/24

Download Windows Server 2019 Image
It is assumed that we do not have any image and we need to download a new one to start the nested VM deployment. In that case, we can download it from the host Virtual Machine. In the image below we can see that we download the image in 10 seconds!

Deploy Nested Virtual Machine
Open the Hyper-V Manager, from the right pane [Actions], select New – Virtual Machine…

Step 1 – Before You Begin
This is the first screen of the deployment Wizard and we just click Next> to continue.

Step 2 – Specify Name and Location
At the next step type the Nested VM name and click Next >

Step 3 – Specify Generation
Select the generation of the Virtual Machine, leave the default (Generation 1), and click Next >

Step 4 – Configure Networking
In 4th step select the Virtual Switch which the Virtual Machine network adapter will use.

Step 5 – Installation Options
Select the option “Install an operating system from a bootable CD/DVD-ROM” – Image file(.iso), click Browse, choose the Windows Server 2019 image file and click Finish.

Windows Server 2019 Installation
1. Select Language And Other Preferences
At the first step, select Language to install, Time and currency format, Keyboard or input method and Click Next >,

At the next form click Install Now,

2. Activate Windows
At the second step, type the [Product Key] and click Next

3. Operating System Selection
At third step select the operating system and click Next

4. End User License Agreement (EULA)
Read the Applicable notices and licenses terms, check the checkbox “I accept the license terms“, and click Next

5. Installation Type
Click the button “Custom: Install Windows only (advanced)”

Check the drive that Windows installed and click Next

Windows Installation starts and after few minutes, Windows Server will be ready to use.

Network Adapter Configuration
After Windows installation finished the first thing we MUST do is to configure the Nested VM network adapter.
| Note |
|---|
| To set the DNS values of this Virtual Machine, we have to configure our DC to use static addresses (192.168.0.9 and 172.25.96.254 in this example). Then, we supply these addresses in the network adapter. |
Setup Static IP Address (as the image below shows)

And disable the Internet Protocol Version 6 (TCP/IPv6)

Azure VNet DNS Server Configuration
After the On-Premises nested Virtual Machine connects with VPN Client on the Azure VNet.
From the Virtual Network main blade, select Settings – DNS Servers, and type the IP Addresses from On-premise Nested Virtual Machine and the P2S VPN IP Address.
After we save DNS Server setting, download the VPN Client to the Azure nested Virtual Machine.

| Important |
|---|
| Both ends (On-Premise Nested VM & Azure Nested VM) MUST be connected to the Point-To-Site VPN [This direction ONLY applies to this demo] |
Domain Controller Role
In the previous step, we successfully complete the OS, and we are ready to move forward by enable the Domain Controller Role and make all the required configurations for the DC replication.
1. Add Roles and Features Wizard
This wizard will help us enable the domain controller role on the Windows Azure Virtual Machine. We just need to follow the next steps.

2. Select installation type
At the next form leave the default selection “Role-based or feature-based installation“, and click Next >

3. Select destination server
At 3rd step, click Next >

4. Select Server Roles
Select the Active Directory Domain Services role and click Next>

5. AD DS
Also we click Next > in this step,

6. Confirmation
Check that the correct feature will install and click Install to begin

7. Results
By following the wizard steps, the role installation starts

Domain Controller Configuration
The last part of this case is to configure the Domain Controller. At the following steps, we are able to complete the scenario by making a replica of the on-premises Domain Controller.
1. Deployment Configuration
At the first wizard page click select… to Add a domain controller to an existing domain, type the domain name, e.g cloudopszone.com and click Next >

2. Domain Controller Options
Select Domain Name System (DNS) server, Global Catalog (GC), from the Site Name drop-down menu select Default-First-Site-Name, type the Directory Services Restore Mode password and click Next>

3. DNS Options
Do NOT check Update DNS delegation and click Next>

4. Additional Options
Select from the Replicate from the drop-down menu, the name of the On-Premises Domain Controller name.

5. Paths
In this post, we use the default paths, BUT the suggested method is to use a different drive NOT the system.

6. Review Options
Check the Review Options, select [View script] to get the configuration as a PowerShell script, and click Next >

7. Prerequisites Check
Check the results from the Prerequisites Check and if everything is OK, click Install to begin the installation.

8. Results
At the final step, we get the message that the server was successfully configured as a domain controller.

Click the button Close, and now the replication has started! You can check the users in the Domain Controller User folder.
| Note |
|---|
| Nested Virtual Machine will be rebooted automatically. |
At the last image, we can see that all the users from the On-Premises Nested VM replicated to the Azure Nested VM domain controller.

Conclusion
In this post series, we read a somewhat complicated scenario, with an on-premises Nested Domain Controller Virtual Machine and another Nested Domain Controller VM in an Azure VM, connected each other with a Point-To-Site VPN (Site-To-Site VPN is the BEST option).