

As time passes, more and more IT professionals want to exploit the potential of the cloud. In this article, we will talk about how we can do an On-Premise Domain Controller replica to an Azure Virtual Machine.
Requirements
On-Premises Configuration
- Existing Domain Controller (Virtual Machine or Barebone computer)
- VPN device
Azure Configuration
- Valid Azure Subscription
- Virtual Machine (with the Active Directory Service Role Installed)
- Virtual Network
Create Virtual Network
From the main blade on the left side select All Services > Search {Virtual Network} >Click Virtual Networks.

Click “+Add” to start a new virtual network creation.

At the next step, fill in the information as the image below shows.

| Setting | Value |
| Name | Type the Vnet Name |
| Address space | The IP range for the VNet |
| Subscription | Select the Azure Subscription |
| Resource Group | Create a New Resource Group or Select an existing |
| Location | Select a location for the Vnet |
| Subnet Name | Type the Name for the Subnet |
| Subnet Address Range | The subnet IP range in CIDR notation |
Create Gateway Subnet
In the following steps, we will create the Gateway Subnet. Through this subnet, we achieved the communication between Vnet and Gateway.
From the Virtual Network main blade, select SETTINGS – Subnets – click “+Gateway subnet”.

Define the Address range e.g [10.1.1.0/28], and type OK

After the previous steps, we have two subnets, as the next image shows.

Create Virtual Network Gateway
At the next steps, we are going to create the Virtual Network Gateway.
Search for the service “Virtual network gateway“, click the first result as the image below shows and at the next blade click Create.

At the {Create virtual network gateway} blade fill all the information’s and click Create to start the deployment.
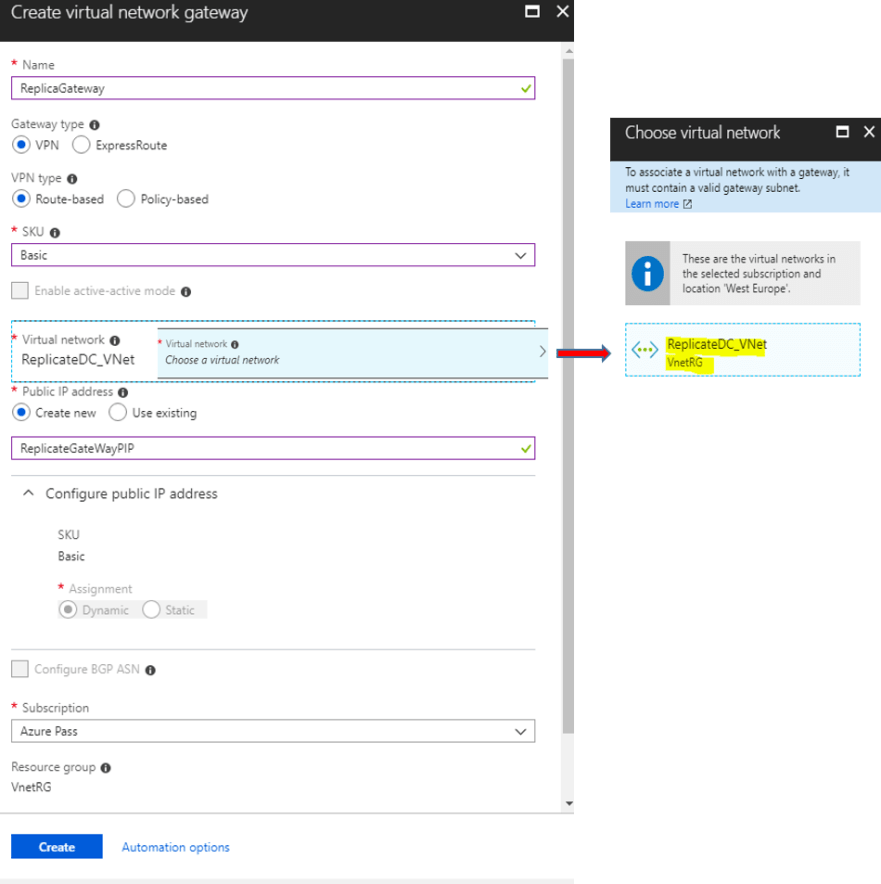
| Setting | Value |
| Name | Type the Virtual Network Gateway Name |
| Gateway Type | Select VPN type |
| VPN Type | Select Route-based VPN type |
| SKU | For this demo we select the Basic SKU |
| Virtual Network | Select the Vnet, which contains the Virtual Network Gateway Subnet |
| Public IP Address | Type a Name for the Virtual Network Gateway Public IP |
| Subscription | Select the Azure Subscription |
| Note |
|---|
| The Virtual Network Gateway deployment can take up to 40 minutes. To be exact for this deployment takes 32 minutes and 37 seconds. |
 Note
NoteMore details about the Virtual Network Gateway Settings:
The Local Network Gateway
The Local Network Gateway refers to the on-premises location.
Create Local Network Gateway
Search for the service {local Network Gateway}, select the first result and click the button Create.

A new blade opens and we must type the information for the Local Network Gateway, as the image below shows.

| Setting | Value |
| Name | Type the Local Network Gateway name |
| IP address | Type the On-Premises VPN device IP |
| Address space | Type the on-premises address range |
| Subscription | Select the Azure Subscription |
| Resource Group | Select the Resource Group |
| Location | Select the same location as the other resource are |
Add Connection for Site-To-Site VPN
At the next step, we must create a connection in the Virtual Network Gateway.
Open the Virtual Network Gateway and in the left blade select SETTINGS – Connections and click +Add.
In the new blade type all the necessary information (as the next image shows), and click OK.

| Setting | Value |
| Name | Type the S2S connection name |
| Connection Type | Select Site-to-site(IPSec) type |
| Virtual Network Gateway | Select the Virtual Network Gateway |
| Local Network Gateway | Select the Local Network Gateway |
| Shared Key(PSK) | Type a Shared key(PSK) |
Once we’ve completed all of the above steps we are ready to make the final step and this is the VPN device configuration.
The next image shows what will be the connection status on a step before we engage Azure and On-Premise infrastructures.

VPN Device Configuration
First, we must click to Download the configuration for the device.
We can select from a list of compatible vendors with Azure.

| Setting | Value |
| Device Vendor | Select the device vendor, e.g Cisco |
| Device Family | Select the device family, e.g. ASA |
| Firmware Version | Select the device firmware version, e.g. Cisco_ASA-9.8+_RouteBased(BGP-over-IKEv2) |
| Note |
|---|
| Since we download the configuration script, we must replace the parameters at the points that the keyword “REPLACE” appears. |
Links for additional configuration information:
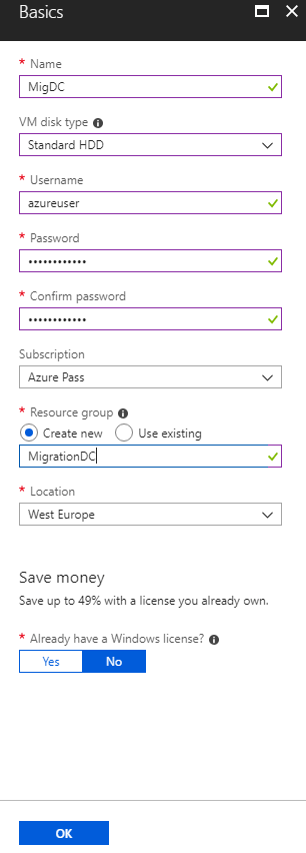
Create Azure Virtual Machine
After we successfuly deploy the Site-To-Site VPN, then we proceed with the Azure Virtual Machine setup. At the step below we can see how to deploy the VM.
Step 1. The Basics blade
Fill in the information’s in the Basics blade.
Step 2. The Settings blade
Following the wizard steps, complete the rest settings as the image below shows and click OK.

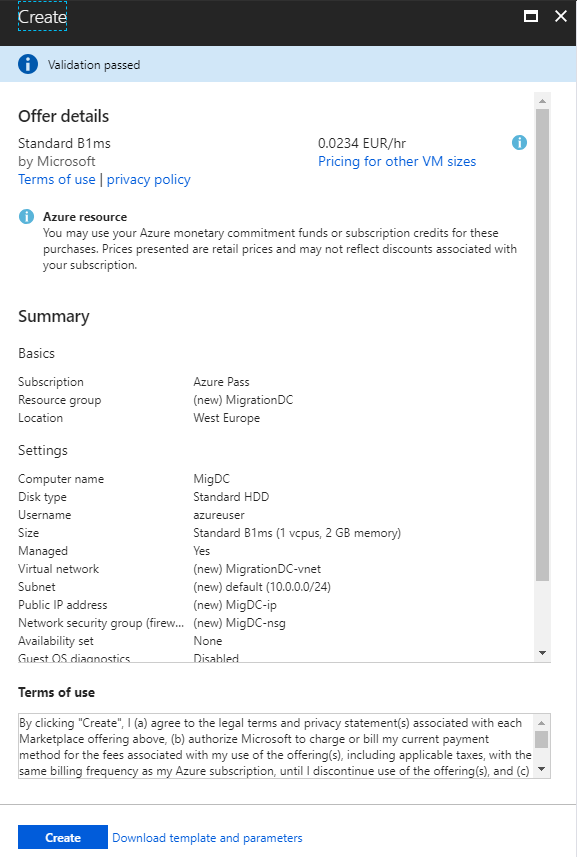
Step 3. The Validation
In the last step, we see the message that the validation passed and by clicking the Create button the deployment started.
Azure Virtual Machine Domain Controller
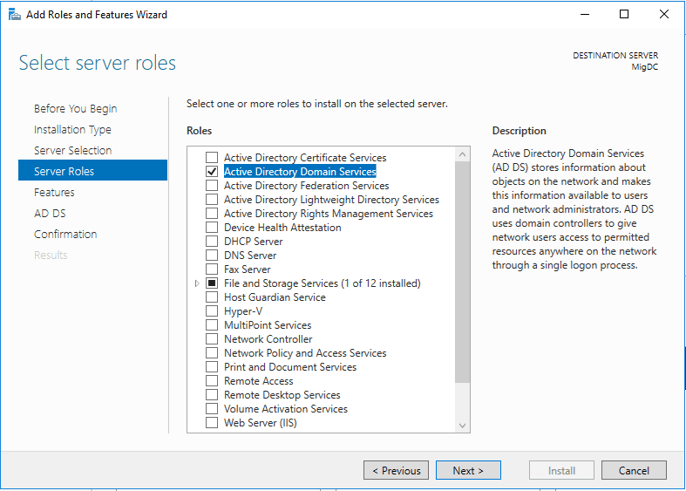
At the following steps we will add the server role and configure the replication procedure.
Add Roles and Features Wizard
Step 1. Server Roles
Select the Active Directory Domain Services role and click Next>
Step 2. Results
By following the wizard steps, installation start adding the role

Domain Controller Configuration
Step 1. Promote server to Domain Controller
After the installation finishes, select Promote this server to a domain controller.

Step 2. Deployment Configuration
At the first wizard form select Add a domain controller to an existing domain, type the domain name, e.g cloudopszone.com and click Next >

Step 3. Select domain from the forest
Type the on-premise administrator credentials, and after that select the domain from the forest.

Step 4. Domain Controller Options
Select Domain Name System (DNS) server, Global Catalog (GC), from the Site Name drop down menu select Default-First-Site-Name, type the Directory Services Restore Mode password and click Next>

Step 5. DNS Options
Do NOT check Update DNS delegation and click Next>

Step 6. Additional Options
Select from the Replicate from: drop-down menu, the name of the On-Premises Domain Controller name.

Step 7. Paths
In this demo we use the default paths, BUT the suggested method is to use a different drive NOT the system.

Step 8. Prerequisites Check
Check the prerequisite check and if all is good click Install to begin the installation.

Step 9. Results
At the final step we get the message that the server was successfully configured as a domain controller.

Click the button Close, and now the replication is started! You can check the users in the Domain Controller User folder.
Related Links
Azure Active Directory Domain Services (Managed Domain)