

When you connect your applications to Microsoft Dataverse, setting up authentication is essential. Choosing the right method keeps your system secure and makes it easier to scale.
A Service Principal offers a secure way to manage backend integrations. In this post, you’ll learn how to set up Microsoft Dataverse authentication using a Service Principal. This approach lets applications connect without user credentials, which is ideal for background services and APIs.
By the end of this guide, you’ll understand why Service Principal authentication is a good choice for production and how to set it up in Dataverse. Let’s begin.
A service principal is an app registration found in the MS Entra tenant. It lets you use the application without logging in with a username and password.
A service principal is a special type of user account in Dataverse that does not need human interaction.
To create a PP service principal, start by registering an app in the Microsoft Entra Id directory. Navigate to https://portal.azure.com, search for the App registrations

Then, choose + New registration

Type a Name, {i.e, PP-ServicePrincipal}, choose as Supported account types {Single tenant only – ######}, and click Register.

Choose “API permissions” from the left menu.

Then click “+ Add a permission“.

Select “Dynamics CRM” from the “Request API Permissions” menu, and check the box for user_impersonation.
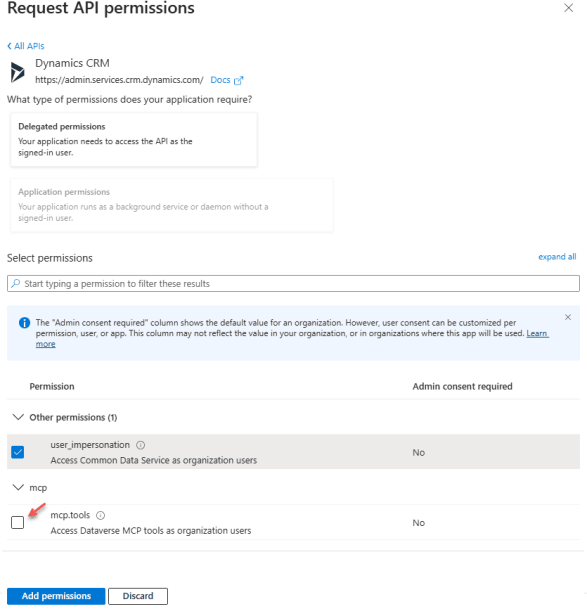
Next, click on “Add Permissions” and select the button labelled “Grant admin consent for {tenant name}“

The next step is to create a new client secret to protect applications from unauthorized access. To do this, navigate to the left-hand menu, select Certificates & secrets, and click on + New client secret.

Create Oauth type
Navigate to the Copilot Studio portal, then find or create the agent you want to add the Dataverse connector to. Go to the topic you want to edit choose, Add a tool – Connector – List rows from selected environment

Choose ” Service Principal” as the Authentication Type

Copy the values below from the App registration you created in the previous step:
- Client ID
- Tenant

- Client Secret

Enter the values in the Microsoft Dataverse connector, and then click the Create button.

After successfully creating the connection, the connector status will appear as shown in the screenshot below.
